
And Behold! The Hatch Story.....
As promised here are the pictures of the companionway and the story that goes with it. I mostly consider it a success. It certainly looks better than before but more work will have to be done in the future to improve upon it. I'll explain later. To start with here is a picture of it before I had even bought the boat. Repairable certainly but it was rough.

Two weekends ago the hatch came off BeBop for repair work. It was in real bad shape. The trim pieces on both the front and back needed to be replaced and the teak veneer was worn thru in a couple of places. The cost of a new 4x4 piece of veneer would of been about $150 before shipping so it was decided after repairing it to paint it in the matching trim colors. The money saved could then go to other projects and it should still look ok. The trim pieces could not be bought directly and would have to be fabricated and bent into place. In addition to that, the hatch cover where the washboards were supposed to meet had about a 1/3 of inch gap that had to be fixed too. So the one weekend project becomes a 2 week project.
The first weekend was spent sanding it down and creating the new 1/4 inch half round for the front and back trim. I picked up 2 pieces of teak that I thought would work for 9 bucks earlier in the week from Don's Marine, but it was too stiff so we had to create a steamer to facilitate bending the wood to shape. I was skeptical at best that would do the trick but in the end it worked ok. Rich and I had to build a poor man's wood steamer and the invention was creative to say the least. We used a turkey deep fryer with a retort on top and connected that to a hydraulic jack handle. Yes a hydraulic jack handle attached to a turkey deep fryer...you can die in peace now that you've heard it all. Should of grabbed a picture of that setup, told ya this is a low budget operation. The deep fryer was used to heat the water to the boiling point where it entered the retort and was directed into the jack handle where the piece of half round was kept for about 1 1/2 hours per piece to reach a point were it could bent enough to be nailed into place. The 1st piece was destroyed because we didn't steam it enough and we tried too hard to bend it into shape....crack!!...chalk it up to the learning curve but we got the other pieces steamed and put on without too much hassle.
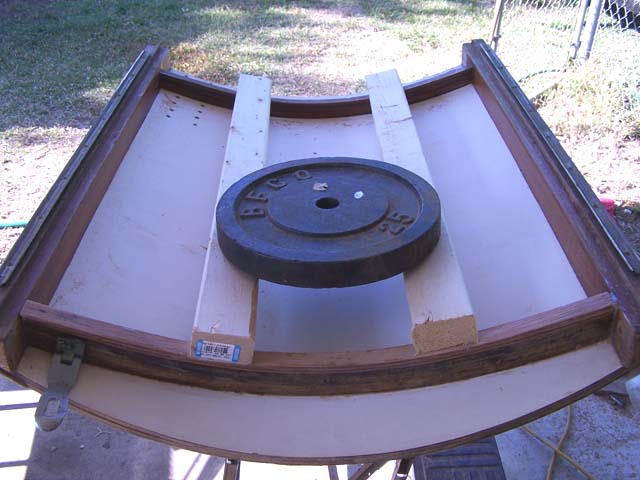
The 1/3" gap where the hatch cover and washboards meet was corrected by laminating 2 pieces of 1/4" marine plywood into place with some 404 micro fiber mixed with fiberglass resin. This added 1/2" to the front hatch/washboard area. The hard part was getting the pieces fabricated so they fit just right and bending them into position while they setup. This was done with a couple of 2x4's and a 25 pound weight as shown in the pictures below. When I build the new washboards in the future this will create a even better seal than now.

All during the following week before and after work a combination of gorilla glue then 404 micro fiber was used to fill in gaps and seal up areas that water had penetrated from years of exposure to the sea. Priming consisted of 2 coast of Interlux Pre-Kote, one per day and sanded the following morning then 2 coats of Interlux Brightsides Sea Green. I'm going for a white with green trim look. That ways it matches the cover on the roller furler and I think it's fitting since the boat was made in England. Here is the finished result that I put back on this morning....it's hard to see the painted hatch cover in this picture because of the green tarp across the mast but I think you can get a feel for what's been done.

I'm fairly happy with the end result. After putting weatherstripping into place it should be a big improvement over how well it battened down before. I still want to replace the washboards time permitting later on next year. The paint job on the hatch cover I'm just so/so with. I'd like to interject that I'm a perfectionist so while I'm sure you'd look at it and say offhand it's great, I see all the little imperfections in it because I built it. I think it will get the job done and looks "ok" but it's not like new for sure. Money being the major constraint here I have to make due the best I can. Hell, compared to the guy who sailed a open dugout canoe across the pacific ocean it's fantastic...and I try to keep reminding myself that every time I doubt my work.
It's back to the grind for me until Thursday. Hope to finish up the prep sanding for topside priming and paint this weekend before the turkey browns. Until then...fair winds.
posted by Jammer @ 8:45 PM
![]()

0 Comments:
Post a Comment
<< Home