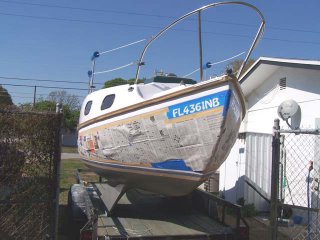
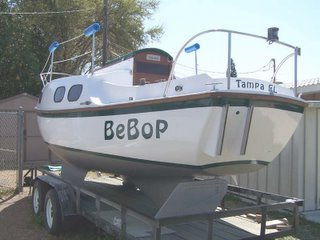
The Facelift Finale....
Hello again everybody and thank you for dropping by. I have made tons of progress this weekend and I can't wait to share it with you. This entry will finish up the BeBop Gets A Facelift series that was started about 2 months ago.
Where to start....if you remember from a few posts ago I mentioned I was going to do all the trim and graphics work myself. Why would I want to inflict this kind of torture upon myself instead of just buying the graphics? The cost was outrageous. In order to get the vessel registration numbers, port of call and the name graphics done in vinyl in the sizes that I wanted would of been over $500. As you all well know this is a budget operation so I had to forget that and once again do it myself. What was the cost of doing it myself? I figure including the paint about $75.
Saturday morning after doing some errands early on Rich and I started to tape off the trim lines under the rub rail and around the waterline. The one under the rub rail was easy. I just took a scribe and taped on a Sharpie measured a 3 inch width, then dragged it all the way across on both sides to get a nice straight line then tape it up. The boot stripe by the waterline took much longer because I couldn't use a scribe to make the lines and I just had to eyeball it. After the basics where done, it was time to put the tape on the areas where the graphics would go on the bow, stern and sides. I plan on doing a whole "How to Paint Your Own Graphics" entry a bit later in the week with full pictures but it goes something like this....
01. Pick the font you wanna use
02. Print out letters to the proper size
03. Cut them out with a razorblade
04. Trace them to heavy poster board
05. Cut that out with a razorblade
06. Tape the area you want the graphic to be
07. Copy the outline to the tape
08. Cut that out with a razorblade
09. Paint and Pray you didn't/don't screw up
10. Remove the tape about a 1/2 hour after you paint them
11. Touch up any mistakes by hand the next day
It took me about 2 minutes tops to type that out and about 10 hours of time after work during the week to reach step 07. Step 07 to 11 was the entire weekend plus the trim. Here is a picture of me tracing the "BeBop" poster board cut out onto the painters tape.

And this is right before painting was started. It was applied the same way the sides were done...Rich rolled it on and I tipped it.

Sunday I slept in some after working so hard Saturday and spent the entire day touching up the trim and graphics. Yes it took that long to do it. I taped up the large trim areas that needed attention and was close to the lines and used a once inch brush very carefully. On the letters, a very small brush was used to straighten out any mistakes since you can't really tape that up again. If you get paint somewhere you shouldn't you'll have to wait for it to dry and go over it with the proper color again. The only real problem was where the tape overlapped itself the paint ran a tiny bit outside the lines. If I could of afforded it I would of used the foot wide painters tape and avoided that issue. Speaking of tape, while it's on my mind, Do NOT use the brown kind of painters tape found at Home Depot. I picked up a roll hoping I could save a buck per roll and it left sticky residue on my teak rub rails that required the use of paint thinner to remove. Bad stuff folks, spend the money and use the blue kind.
Ok...big moment here. This is a picture you've all seen before, it's the day I bought her back in November of last year.

This is today, after touching up the trim and graphics.

Wow, it's all I can say.
They turned out really nice and didn't require too much in the way of touch up really. I don't think vinyl graphics would of looked any better. Actually the opposite since the painted letters have a shine that cannot be matched by any piece of vinyl. Harder to do and harder to maintain but cheaper by far. Imho, this is also a lot classier.
There is still so much work to be done so don't think I'm wrapping up the refit yet. The mast and boom need to be finished, all of the interior, the cockpit needs a little more work, fabricate new washboards and of course Notes, my stitch and glue yacht tender just received her last coat of primer today (courtesy of Rich) and will probably be finished in about 3 weeks if I dedicate some time during the week after work. After all that, *then* I get to put Bebop back in the water and move onboard, probably sometime in July thru August. (Yay!) The time passes so quick though, It feels like I just started yesterday and here we are finishing up the major parts of the exterior.
Ok guys, getting tired so I'm signing off for this weekend, have a nice week and I hope to have that How To guide up sometime in the next few days. Until then Fair Winds.....


4 Comments:
It looks great. Your hard work has paid off. Great job!! It absolutely is not the same boat.
Thank you abqjude!
I would say my hard work is paying off (finally) but I still have a long way to go before she's ready. ^_^ It takes time but so far so good.
Oh, your the one who's bugging me for more pictures of Notes hehehe...
Soon lol...under a month for sure now.
Jammer
nice job on the paint;ill e-mail you
gary
Hi Gary,
Thank you very much sir for the compliment.
You've Got Mail!
Jammer
Post a Comment
<< Home