
How To Paint Your Own Graphics
*Disclaimer*
This guide is not meant to be all inclusive or encompassing. If you decide to try this and mess up your boat, I take no responsibility. This is posted only as a general reference to help you get started.
Enough of that kinda stuff, hate to have to put that there but in this day and age....you know how it is.
Ok, so you wanna do your own boat lettering eh? Excellent! It's time consuming and tedious work, but when it's complete, you have saved a lot of money and you'll have a great looking boat. This information could also be applied to simple graphic designs too. I may yet add some to my boat.
Please note not all steps will have pictures. Space is limited on blogger for photos so I'm going to just include the ones I feel are most relevant. I hope my descriptions will be good enough for the rest. This is also my first real how to guide, so ya know, have a heart ok?
Step 01
The first thing you need to do is decide on the font you wish to use. Are you going for old school, ultra modern or cursive? There are literally thousands of fonts you can find for free on the internet. It's enough to give you a headache trying to decide! In my case I used one called Batavia. I thought it was bold, had the right slant that I was looking for and is easy to read. 1001 free fonts would be a excellent place to start a search for one.
Step 02
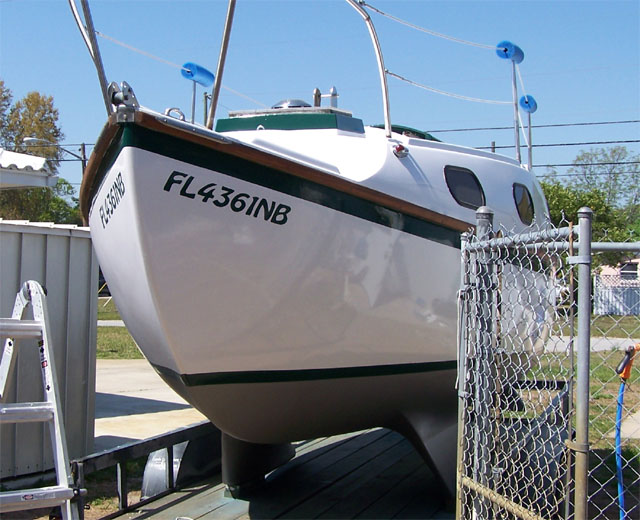
After you decide on the font, you will need to decide how big you want the lettering to be on your boat. I like a big, bold, easy to see name, so I decided my lettering for BeBop should be about 10 inches for the capital letters and for the bow registration numbers 3 inches was about right. You will want to check with laws in your area concerning the size and placement of the registration numbers too. Using your favorite word processing program, print them out in the correct font size. In my case with 10 inch letters the font size was about 700 with one letter per page. Something to keep in mind is you only need to create one set of letters and numbers to do both sides.
Step 03
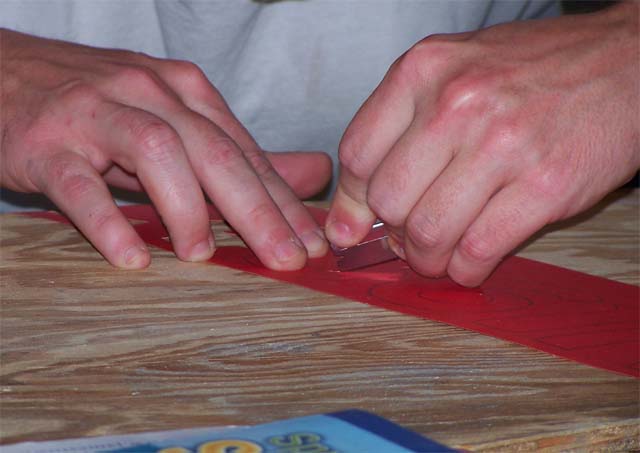
After you have them printed out on regular paper you will need to cut them out. I find that a single sided razor blade works better over a pair of sissors. Use whatever you feel more comfortable with.
Step 04
 Now you have the letters on regular paper cut out you will need to make your stencil. I find that the .50 cents a sheet poster board you can buy at Big Lots works just fine. I would suggest you draw a base line on the poster board so when you copy the letters onto the posterboard with a pen or pencil the bottom will be even and straight.
Step 05
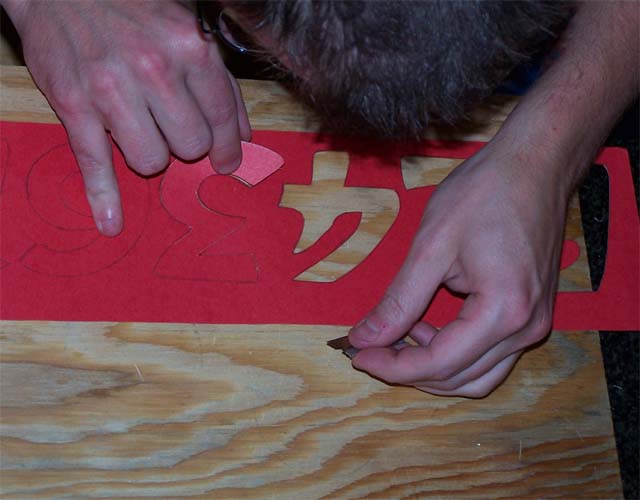 Now we have the stencil traced out on the poster board but you need to cut out the letters or numbers using a razor blade. Sissors will not work for this step. Substitute a Exacto knife if you like. The better you cut them out the better your lettering will look. Take your time, be patient, this is tedious work.
Step 06
 Now you need to decide where you what your graphics to be, it's completely up to you. You need clean the area where the graphics or lettering will be and apply the painters tape to the area. I would recommend the 3M blue tape you can pick up at Home Depot. I couldn't afford the really wide kind but the less overlapping tape you have the better the end result will be because the paint will run behind it just a tiny little bit where the edges meet. Take you time here and make sure the tape has very good contact with the surface your going to paint.
Step 07
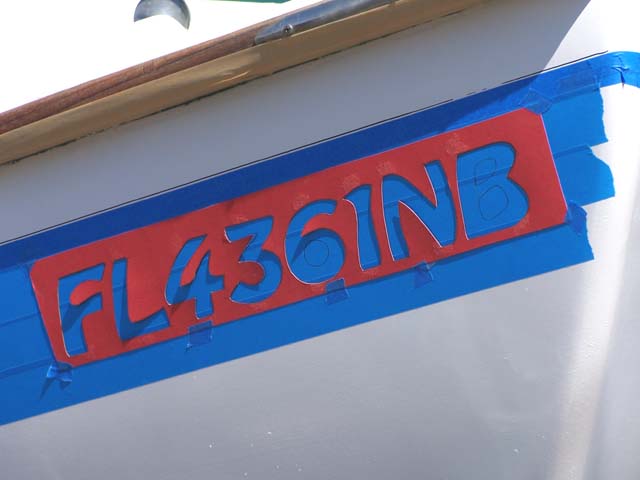
 Using the stencil you created in steps 04 and 05 tack it up over the area you just taped up and outline the lettering onto the painters tape as careful as possible. Accuracy counts here. I would recommend taking it easy on the morning coffee! I would use some sort of reference point on one side so when you do the other it will match. I ran a plumb line off my winch with my measuring tape tied to it as a weight and used the 2nd "B" in BeBop to line up under the winch on both sides.
Step 08
 Using your Exacto knife or single sided razor blade you need to cut the outline of your lettering onto the painters tape. The idea here is to cut just deep enough to go through the tape but not score the hull or paint. Easier said than done..and no...I wasn't completely successful in this area but I did go back over the areas where I went too deep with the blade and touched them up the next day. This is for the money so to speak. The end result will only be as good as your cutting the lettering out of the painters tape.
Step 09
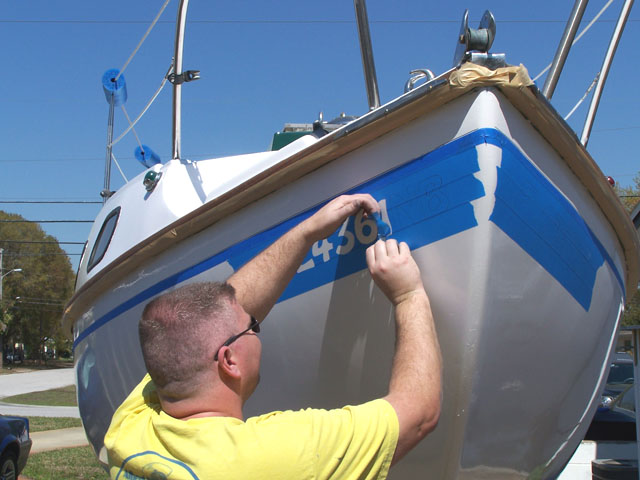
 Cover and tape up any area you are afraid of getting paint on where it doesn't belong. The prep work with painting is always 90% of the job. You can see just how much prep we did in this picture....but no paint got anywhere on the sides! If you try and cut corners you'll undoubtedly regret it. With my friend Rich's help, we rolled the areas and then tipped the paint with a 4 inch brush. I won't go into great detail with this guide on painting techniques as I'm sure there are better ones available on the net.
Step 10
 Give it about a half hour plus or minus depending on how the weather conditions are in your area before you remove the painters tape. I try to pull it off at about a 45 degree angle to the surface to get a clean edge. If you wait too long and the paint is allowed to totally dry, the edges will look like crap when you remove the tape.
Step 11
 Unless you do this for a living your gonna have a few mistake areas. Don't try and fix them the same day, wait until the paint is completely dry. 24 hours should be enough. Take a very small detail brush and do the touch up work. You might have a little or a lot depending on how well you did the prep work. If you make errors like going outside the B in BeBop with the green (I admit it) let it dry and touch it up with the proper color.
Step 12
 Bask in the glow of Ohhh's and Ahhh's from you jealous friends.
This really isn't such a difficult thing to do. It just takes time, patience, dedication and you will learn the skills as you go along. the end results when your done will make you one very proud sailor in your marina and think of all the money you saved too.
I'd like to add in a hearty thank you for Rich's assistance on this project. He worked just as hard as I did.
I'd be happy to answer any questions you might have via email (listed below) or you can leave a comment and I'll be happy to respond that way too.
Fair Winds..
Jammer
S/V BeBop
the.jammer@gmail.com
posted by Jammer @ 9:35 PM
![]()

0 Comments:
Post a Comment
<< Home