BeBop Around The World

Even though the trip has been called off, I'm leaving this site up to read for anybody interesting in refitting a boat or sailing in general.

Sunday, March 26, 2006

Notes Floats!!...

As promised Notes is finished and here are the pictures! I burned the midnight oil all week to finish working on all the little details in preparation for today's launch. About wensday I was feeling the pressure to get her done because I promised you all that I would by this weekend.

Without further adieu, I present Notes, the stitch and glue yacht tender that I built from scratch.


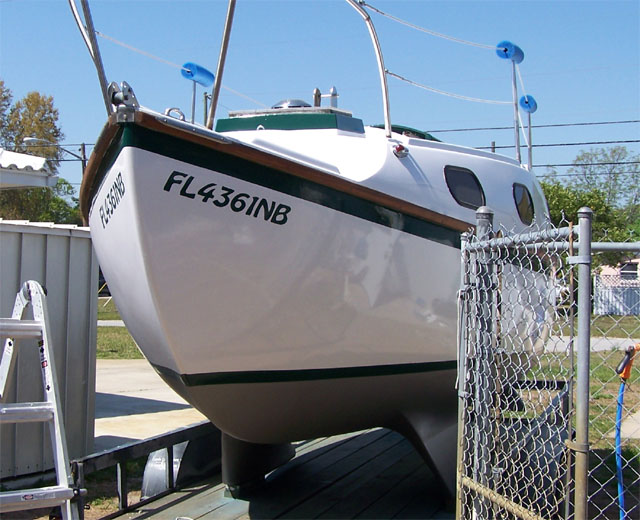
As you can see it's a hard chine, very traditional design. The bottom has not been covered with anti-fouling paint yet as it's not really needed until I'm living onboard BeBop and traveling around.


In this picture you can see the oar leathers and buttons. There were easier ways to accomplish the goal of keeping the oars from falling out of the oarlocks but this was the classy way to do it. It took quite some time on Saturday to soak the leather, measure the position out and secure them on with stainless steel brads. I had some left over material and Rich used it to make leather covers for the oar locks too. I must admit I had my doubts but they came out great! (thanks Rich)


Hehehe....very small eh? The pictures above don't do justice to her size. Only 7 feet long but she does have some heft. I haven't weighted her out yet on a scale but I bet she's about 60 pounds.


I'm sure you all know when you commission a boat you have to break a bottle of champaign. Well, I might of went overboard but I decided to use a champaign split to commission Notes lol. Figured a very small boat needs a very small bottle of champaign. The ceremony lasted about 1 minute, Rich and I each had a drink and some was spilled into the water as custom dictated and no..it wasn't broken on the bow....it just made for a cool picture hehehe.


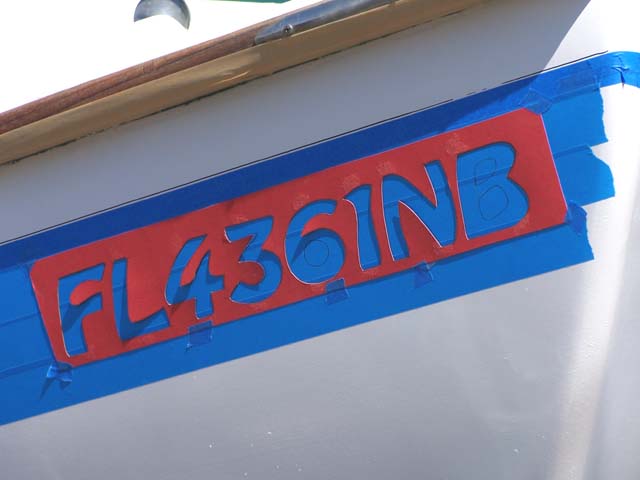
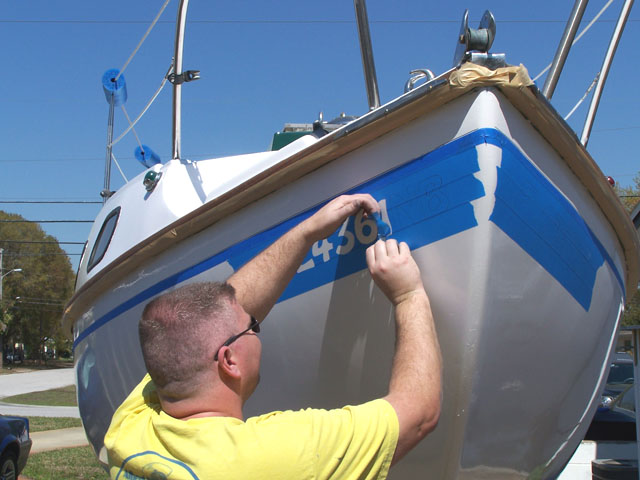
She floating! (and more importantly, didn't turn turtle) I have the waterline painted totally wrong. It's too low by about 3 inches from the stern to the bow. Easy to fix though when I go to put the anti-fouling paint on the bottom.


Row, row, row your boat, gently down the (tampa) bay....


Just rowing her around, I went over to that island there then rowed into the marina that's in the picture towards the top entry. I got some very weird looks from a couple of fisherman fueling up their boat as I rowed on by while I was whistling. I yelled out howdy and they just stood there staring at my little boat.


Richard taking her out for a row. Thanks for assisting me these past few weeks in helping me get her done.

I'm pretty pleased with the results of my labor. Some things still need to be adjusted. I mentioned the waterline will have to be corrected as I had no idea were it really was until today and the oar locks need to be narrowed down some as they are about a 1/4" too wide. (the oars can come out) The only thing I'm not real happy with is the bow is just a tad bit low in the water. I'm not exactly sure why. Perhaps the oar and seating placement is too far forward or I might have too much weight up near the bow when I redesigned the interior from the stock plans. In any event, it's not something I can easily correct and it doesn't seem to make a difference on how she performs. I still need to test my trolling motor and I'm sure the bow will be perfect with it and battery mounted on the stern. Have to cut me some slack, it's the first boat I ever built. ^_^

Well that pretty much wraps up the Notes project. Still some stuff to do and one more water test for the trolling motor is coming but I doubt it will be interesting enough to post about.

I will make mention that yes I've broken down and put up some adverts and a donation button (coming soon) on this site. I know you want to know my reasons why. I really thought long and hard about it before I took the plunge. I spend at least 3 to 5 hours a week, taking pictures of what I do, editing them for publishing then writing up the articles. After that I try and answer any email I get in great detail on what I've done, or to help anybody with any questions about boats, how to's or simply my plans. That's time I could be relaxing or doing more work on the project. I don't mind and I think it's fun, or I wouldn't run this blog, but it still takes time.

I've mentioned plenty enough in the past I'm not a very wealthy man. I make do with what I have and can afford on literally a paycheck to paycheck basis. Sometimes it's enough, other times not much gets done for lack of funds. If you would like to help me out in a passive way, just click a amazon link on my site before you make a purchase from their online store and I'll receive a bit of credit for it. If you really dig what I write about each week, from exciting stuff like today to boring mast painting, I'm going to have the donation link up very soon. It might sound silly but $5 bucks buys 2 clevis and clovis pins. That's about 20mins less per set I have to work to get BeBop Around The World.

Until next time Fair Winds....

Sunday, March 19, 2006

Restoring The Mast.....

This weekend I started cleaning up the mast and taking off all the old hardware that wasn't riveted on. This was going to be just a one weekend project but of course I under estimated the work required to finish the job. As it sits right now, the mast and boom are primed and the finishing work have to take place next weekend.

Friday after work Richard took off all the old cleats, sheves, blocks and wind vane from the mast so we could get right down to work on Saturday. Upon inspection of all the old hardware it was obvious that the cleats would have to be replaced but the blocks should be ok to reuse. The sheves will require more work to clean up but I don't think I will be able to find replacements very easy anyway.

First thing we did was run down to West Marine to get some new cleats and clovis/clevis pins. The aluminum cleats were about $30 a pop and I need 4. Ouch. So we replaced them with nylon cleats at $7 bucks a pop and they should work just fine. The hardware is stainless steel and the load is vertical, not horizontal like on a deck cleat where they would break. I ended up not buying the clovis and clevis pins there as I might be able to buy them cheaper online. When we got back home we discovered a problem. The holes on the new cleats were different than the old ones on the mast. Same size screws, different distance apart. So what we ended up doing was using the top hole from the old cleats, filled in the bottom ones with fiberglass mixed with 404 micro fiber, then drilled and tapped new ones that would fit right. We encountered the same problem with the mast deck light and had to do the same thing. You can see in this picture me tapping a freshly drilled hole.


Here is what the hole looks like with the tap in it. You can see the old mounting hole that was filled in with 404. It was later sanded flush and you can't even tell that it was there once I primed it.


We also drilled and tapped the holes for the VHF antenna bracket and wind indicator extention kit. (was interfering with the VHF antenna)

Sunday we sanded down the entire thing, then taped up all the hardware that couldn't be removed. Then we cleaned the surface with denatured alcohol and primed both the mast and boom with krylon metal primer. The initial plan was to paint the entire thing with rattle cans but after doing the primer coat twice, we ran some quick calculations and it turns out for just slightly more money I can use Interlux Brightsides for the final coat. I'm sure that the rattle can job would of worked fine and in some ways could be easier to deal with in the future but Brightsides will last longer. I just mention it in case anybody reads this and is considering redoing their mast.

I know that all sounded like a easy task but I assure you it wasn't. I was lucky that I had a tap and die set that would work. It just paid for itself this weekend. This picture is before we started sanding on it.


This is after two coats of primer, but hasn't been sanded yet for final painting.


I think it looks pretty good so far, better than it did anyway. It won't be completed until next weekend.

Notes, my stitch and glue dory, also received her two final exterior coats of paint. I'm going to do the exterior trim painting after work this week. Next weekend she's going into the water finally! I hope she rows ok, doesn't sink or bury her bow into the waves. I'm really excited after spending 6 months building her to see if I did a good job. It would be heartbreaking if she doesn't work right and I don't really have the time to build another one if I failed. Sink or swim, next week you'll have pictures of it right here.

Alright folks that's it for this weekend. I know priming the mast is boring by comparison to the previous two weeks entries but hey, it all has to be done eventually. Until next weekend....Fair Winds....

Monday, March 13, 2006

And The Cockpit Was Completed.....

This will be a quick update as I wrote the How to Paint Your Own Graphics guide during the middle of last week.....

I've gotten a good bit of work done this weekend even if I do feel like I slacked off a little bit, but I'm also recovering after 2 very long weekends of working on BeBop but you have all seen how it came together.

This weekend was spend cleaning her up as I was painting the previous weekends. I reinstalled the cockpit locker too. It's amazing how dirty she gets simply sitting on the trailer. All the pollution in the air covers her in about 24 hours flat. I think she'll stay cleaner once she's in the water strange as it may sound. Anyway...I think you'll remember this photo taken about 2 months ago of the cockpit being prepped for paint.


And this is the end result this weekend after putting everything but the tiller back in.


The tiller still needs to be sanded and varnished and won't be ready for some time, but no real rush on that and it makes for a nice after work project during the week.

Notes received both final interior coats of white this weekend and will get the interior green trim after work hopefully...if I can come up with enough spare energy. Next weekend I'm hoping to do the exterior coats and finish the trim during that week and launch her 2 weekends from now. This might get dragged out to 3 weeks depending on how things go. Heh, seems like I'm forever running behind schedule...hey wait a sec...that reminds me of something....like sailing. Sailing=forget the schedule. Things happen when they happen mon. (Jamaican accent) I suspect there will be plenty of photos of the launch...assuming that you know....she actually floats and rows ok without sinking. It will be just horrible if she doesn't row right or something...a very real worry now that the launch is just around the corner.

This coming weekend assuming the parts I ordered arrive from defender, I'll be working on taking everything off the mast and painting it as well as installing a VHF antenna, new cleats and a replacement mast deck light.

That's it, a quickie update for everybody. Hope you all have a nice week and I'll have some cool photos of the mast on the next update. Until then..Fair Winds...

Thursday, March 09, 2006

How To Paint Your Own Graphics

*Disclaimer*

This guide is not meant to be all inclusive or encompassing. If you decide to try this and mess up your boat, I take no responsibility. This is posted only as a general reference to help you get started.

Enough of that kinda stuff, hate to have to put that there but in this day and age....you know how it is.

Ok, so you wanna do your own boat lettering eh? Excellent! It's time consuming and tedious work, but when it's complete, you have saved a lot of money and you'll have a great looking boat. This information could also be applied to simple graphic designs too. I may yet add some to my boat.

Please note not all steps will have pictures. Space is limited on blogger for photos so I'm going to just include the ones I feel are most relevant. I hope my descriptions will be good enough for the rest. This is also my first real how to guide, so ya know, have a heart ok?

Step 01

The first thing you need to do is decide on the font you wish to use. Are you going for old school, ultra modern or cursive? There are literally thousands of fonts you can find for free on the internet. It's enough to give you a headache trying to decide! In my case I used one called Batavia. I thought it was bold, had the right slant that I was looking for and is easy to read. 1001 free fonts would be a excellent place to start a search for one.

Step 02

After you decide on the font, you will need to decide how big you want the lettering to be on your boat. I like a big, bold, easy to see name, so I decided my lettering for BeBop should be about 10 inches for the capital letters and for the bow registration numbers 3 inches was about right. You will want to check with laws in your area concerning the size and placement of the registration numbers too. Using your favorite word processing program, print them out in the correct font size. In my case with 10 inch letters the font size was about 700 with one letter per page. Something to keep in mind is you only need to create one set of letters and numbers to do both sides.

Step 03

After you have them printed out on regular paper you will need to cut them out. I find that a single sided razor blade works better over a pair of sissors. Use whatever you feel more comfortable with.

Step 04

Now you have the letters on regular paper cut out you will need to make your stencil. I find that the .50 cents a sheet poster board you can buy at Big Lots works just fine. I would suggest you draw a base line on the poster board so when you copy the letters onto the posterboard with a pen or pencil the bottom will be even and straight.


Step 05

Now we have the stencil traced out on the poster board but you need to cut out the letters or numbers using a razor blade. Sissors will not work for this step. Substitute a Exacto knife if you like. The better you cut them out the better your lettering will look. Take your time, be patient, this is tedious work.


Step 06

Now you need to decide where you what your graphics to be, it's completely up to you. You need clean the area where the graphics or lettering will be and apply the painters tape to the area. I would recommend the 3M blue tape you can pick up at Home Depot. I couldn't afford the really wide kind but the less overlapping tape you have the better the end result will be because the paint will run behind it just a tiny little bit where the edges meet. Take you time here and make sure the tape has very good contact with the surface your going to paint.

Step 07

Using the stencil you created in steps 04 and 05 tack it up over the area you just taped up and outline the lettering onto the painters tape as careful as possible. Accuracy counts here. I would recommend taking it easy on the morning coffee! I would use some sort of reference point on one side so when you do the other it will match. I ran a plumb line off my winch with my measuring tape tied to it as a weight and used the 2nd "B" in BeBop to line up under the winch on both sides.

Step 08

Using your Exacto knife or single sided razor blade you need to cut the outline of your lettering onto the painters tape. The idea here is to cut just deep enough to go through the tape but not score the hull or paint. Easier said than done..and no...I wasn't completely successful in this area but I did go back over the areas where I went too deep with the blade and touched them up the next day. This is for the money so to speak. The end result will only be as good as your cutting the lettering out of the painters tape.

Step 09

Cover and tape up any area you are afraid of getting paint on where it doesn't belong. The prep work with painting is always 90% of the job. You can see just how much prep we did in this picture....but no paint got anywhere on the sides! If you try and cut corners you'll undoubtedly regret it. With my friend Rich's help, we rolled the areas and then tipped the paint with a 4 inch brush. I won't go into great detail with this guide on painting techniques as I'm sure there are better ones available on the net.

Step 10

Give it about a half hour plus or minus depending on how the weather conditions are in your area before you remove the painters tape. I try to pull it off at about a 45 degree angle to the surface to get a clean edge. If you wait too long and the paint is allowed to totally dry, the edges will look like crap when you remove the tape.


Step 11

Unless you do this for a living your gonna have a few mistake areas. Don't try and fix them the same day, wait until the paint is completely dry. 24 hours should be enough. Take a very small detail brush and do the touch up work. You might have a little or a lot depending on how well you did the prep work. If you make errors like going outside the B in BeBop with the green (I admit it) let it dry and touch it up with the proper color.


Step 12

Bask in the glow of Ohhh's and Ahhh's from you jealous friends.

This really isn't such a difficult thing to do. It just takes time, patience, dedication and you will learn the skills as you go along. the end results when your done will make you one very proud sailor in your marina and think of all the money you saved too.

I'd like to add in a hearty thank you for Rich's assistance on this project. He worked just as hard as I did.

I'd be happy to answer any questions you might have via email (listed below) or you can leave a comment and I'll be happy to respond that way too.

Fair Winds..

Jammer
S/V BeBop
the.jammer@gmail.com

Sunday, March 05, 2006

The Facelift Finale....

Hello again everybody and thank you for dropping by. I have made tons of progress this weekend and I can't wait to share it with you. This entry will finish up the BeBop Gets A Facelift series that was started about 2 months ago.

Where to start....if you remember from a few posts ago I mentioned I was going to do all the trim and graphics work myself. Why would I want to inflict this kind of torture upon myself instead of just buying the graphics? The cost was outrageous. In order to get the vessel registration numbers, port of call and the name graphics done in vinyl in the sizes that I wanted would of been over $500. As you all well know this is a budget operation so I had to forget that and once again do it myself. What was the cost of doing it myself? I figure including the paint about $75.

Saturday morning after doing some errands early on Rich and I started to tape off the trim lines under the rub rail and around the waterline. The one under the rub rail was easy. I just took a scribe and taped on a Sharpie measured a 3 inch width, then dragged it all the way across on both sides to get a nice straight line then tape it up. The boot stripe by the waterline took much longer because I couldn't use a scribe to make the lines and I just had to eyeball it. After the basics where done, it was time to put the tape on the areas where the graphics would go on the bow, stern and sides. I plan on doing a whole "How to Paint Your Own Graphics" entry a bit later in the week with full pictures but it goes something like this....

01. Pick the font you wanna use
02. Print out letters to the proper size
03. Cut them out with a razorblade
04. Trace them to heavy poster board
05. Cut that out with a razorblade
06. Tape the area you want the graphic to be
07. Copy the outline to the tape
08. Cut that out with a razorblade
09. Paint and Pray you didn't/don't screw up
10. Remove the tape about a 1/2 hour after you paint them
11. Touch up any mistakes by hand the next day

It took me about 2 minutes tops to type that out and about 10 hours of time after work during the week to reach step 07. Step 07 to 11 was the entire weekend plus the trim. Here is a picture of me tracing the "BeBop" poster board cut out onto the painters tape.


And this is right before painting was started. It was applied the same way the sides were done...Rich rolled it on and I tipped it.


Sunday I slept in some after working so hard Saturday and spent the entire day touching up the trim and graphics. Yes it took that long to do it. I taped up the large trim areas that needed attention and was close to the lines and used a once inch brush very carefully. On the letters, a very small brush was used to straighten out any mistakes since you can't really tape that up again. If you get paint somewhere you shouldn't you'll have to wait for it to dry and go over it with the proper color again. The only real problem was where the tape overlapped itself the paint ran a tiny bit outside the lines. If I could of afforded it I would of used the foot wide painters tape and avoided that issue. Speaking of tape, while it's on my mind, Do NOT use the brown kind of painters tape found at Home Depot. I picked up a roll hoping I could save a buck per roll and it left sticky residue on my teak rub rails that required the use of paint thinner to remove. Bad stuff folks, spend the money and use the blue kind.

Ok...big moment here. This is a picture you've all seen before, it's the day I bought her back in November of last year.


This is today, after touching up the trim and graphics.


Wow, it's all I can say.

They turned out really nice and didn't require too much in the way of touch up really. I don't think vinyl graphics would of looked any better. Actually the opposite since the painted letters have a shine that cannot be matched by any piece of vinyl. Harder to do and harder to maintain but cheaper by far. Imho, this is also a lot classier.

There is still so much work to be done so don't think I'm wrapping up the refit yet. The mast and boom need to be finished, all of the interior, the cockpit needs a little more work, fabricate new washboards and of course Notes, my stitch and glue yacht tender just received her last coat of primer today (courtesy of Rich) and will probably be finished in about 3 weeks if I dedicate some time during the week after work. After all that, *then* I get to put Bebop back in the water and move onboard, probably sometime in July thru August. (Yay!) The time passes so quick though, It feels like I just started yesterday and here we are finishing up the major parts of the exterior.

Ok guys, getting tired so I'm signing off for this weekend, have a nice week and I hope to have that How To guide up sometime in the next few days. Until then Fair Winds.....